Developer Guide
About RecruitIn

RecruitIn is a desktop app for recruiters in Singapore to keep track of the plethora of clients with different skill sets, availability and experience.
It is optimized for quick text-based inputs via a Command Line Interface (CLI) while still having the ease of use of a Graphical User Interface (GUI).
This product will make recruiters’ lives easier through categorisation and filter features to easily access candidates they have in mind.
Table of Contents
- About this guide
- Acknowledgements
- Setting up, getting started
- Design
- Implementation
- Documentation, logging, testing, configuration, dev-ops
- Appendix A: Requirements
- Appendix B: Instructions for manual testing
- Appendix C: Effort
About this guide
This guide aims to help developers get familiar with how RecruitIn functions.
- To understand the design of RecruitIn on a higher level, you may visit Design for implementation details of each component of RecruitIn.
- If you wish to go further to understand how certain features are implemented on a lower level, you may visit Implementation for noteworthy implementation details of important features.
- If you wish to conduct some manual testing of RecruitIn, you may visit Appendix B: Instructions for manual testing to find various test cases and expected results for some features of RecruitIn.
- If you wish to make further developments to RecruitIn, you may follow the guide at Setting up, getting started for a quick set up of your development environment.
Acknowledgements
Setting up, getting started
Refer to the guide Setting up and getting started.
Design
Architecture
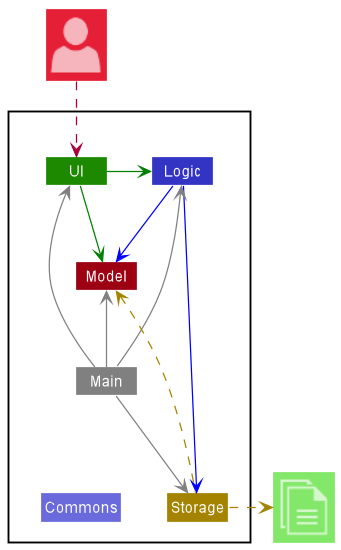
The Architecture Diagram given above explains the high-level design of the App.
Given below is a quick overview of main components and how they interact with each other.
Main components of the architecture
Main has two classes called Main and MainApp. It is responsible for,
- At app launch: Initializes the components in the correct sequence, and connects them up with each other.
- At shut down: Shuts down the components and invokes cleanup methods where necessary.
Commons represents a collection of classes used by multiple other components.
The rest of the App consists of four components.
-
UI: The UI of the App. -
Logic: The command executor. -
Model: Holds the data of the App in memory. -
Storage: Reads data from, and writes data to, the hard disk.
How the architecture components interact with each other
The Sequence Diagram below shows how the components interact with each other for the scenario where the user issues the command delete 1.
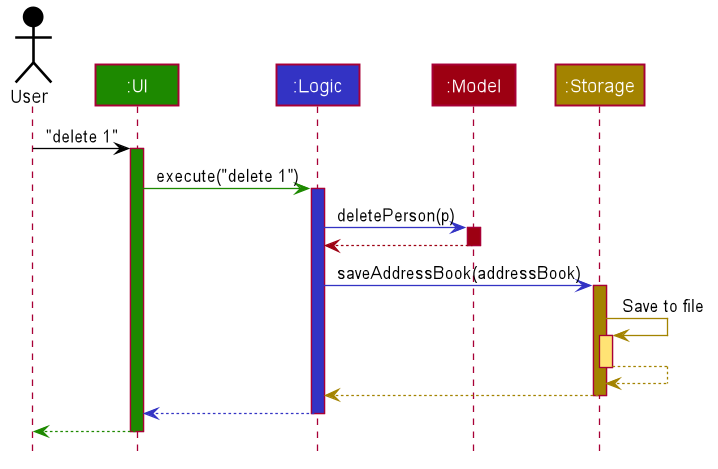
Each of the four main components (also shown in the diagram above),
- defines its API in an
interfacewith the same name as the Component. - implements its functionality using a concrete
{Component Name}Managerclass (which follows the corresponding APIinterfacementioned in the previous point.
For example, the Logic component defines its API in the Logic.java interface and implements its functionality using the LogicManager.java class which follows the Logic interface. Other components interact with a given component through its interface rather than the concrete class (reason: to prevent outside component’s being coupled to the implementation of a component), as illustrated in the (partial) class diagram below.
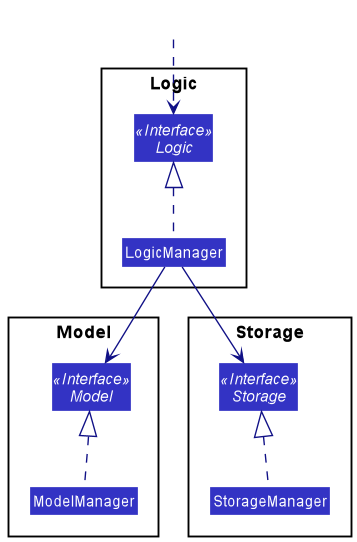
The sections below give more details of each component.
UI component
The API of this component is specified in Ui.java
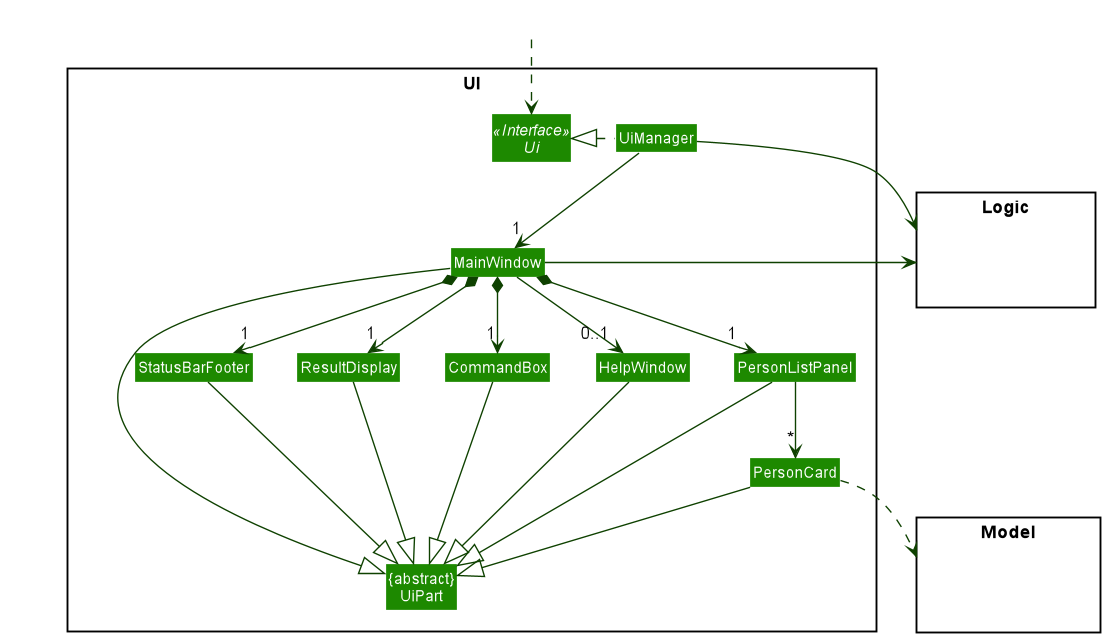
The UI consists of a MainWindow that is made up of parts e.g.CommandBox, ResultDisplay, PersonListPanel, StatusBarFooter etc. All these, including the MainWindow, inherit from the abstract UiPart class which captures the commonalities between classes that represent parts of the visible GUI.
The UI component uses the JavaFx UI framework. The layout of these UI parts are defined in matching .fxml files that are in the src/main/resources/view folder. For example, the layout of the MainWindow is specified in MainWindow.fxml
The UI component,
- executes user commands using the
Logiccomponent. - listens for changes to
Modeldata so that the UI can be updated with the modified data. - keeps a reference to the
Logiccomponent, because theUIrelies on theLogicto execute commands. - depends on some classes in the
Modelcomponent, as it displaysPersonobject residing in theModel.
Logic component
API : Logic.java
Here’s a (partial) class diagram of the Logic component:
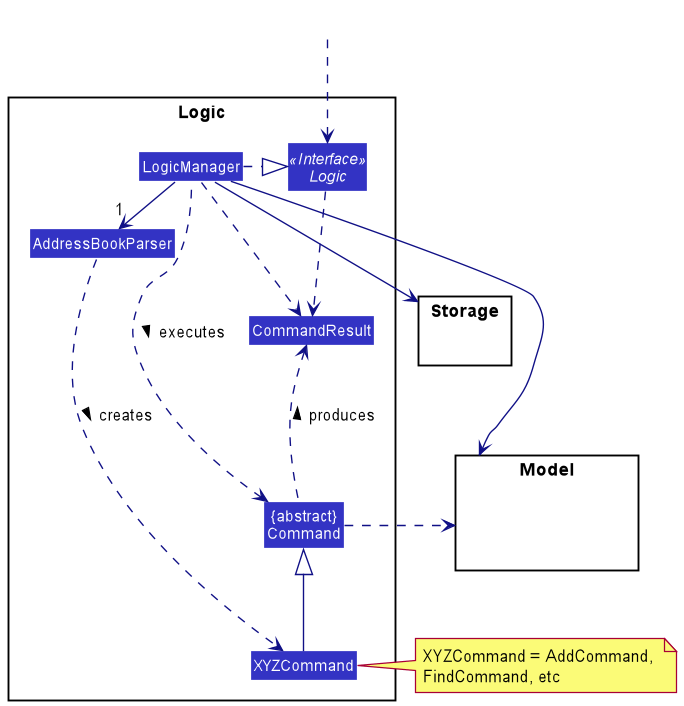
How the Logic component works:
- When
Logicis called upon to execute a command, it uses theAddressBookParserclass to parse the user command. - This results in a
Commandobject (more precisely, an object of one of its subclasses e.g.,AddCommand) which is executed by theLogicManager. - The command can communicate with the
Modelwhen it is executed (e.g. to add a person). - The result of the command execution is encapsulated as a
CommandResultobject which is returned back fromLogic.
The Sequence Diagram below illustrates the interactions within the Logic component for the execute("delete 1") API call.
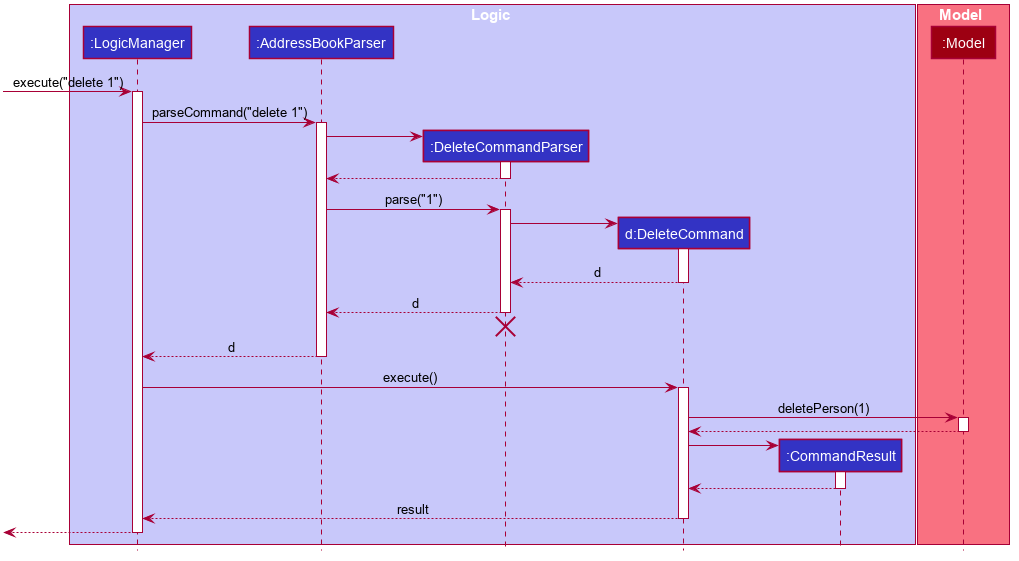
DeleteCommandParser should end at the destroy marker (X) but due to a limitation of PlantUML, the lifeline reaches the end of diagram.
Here are the other classes in Logic (omitted from the class diagram above) that are used for parsing a user command:
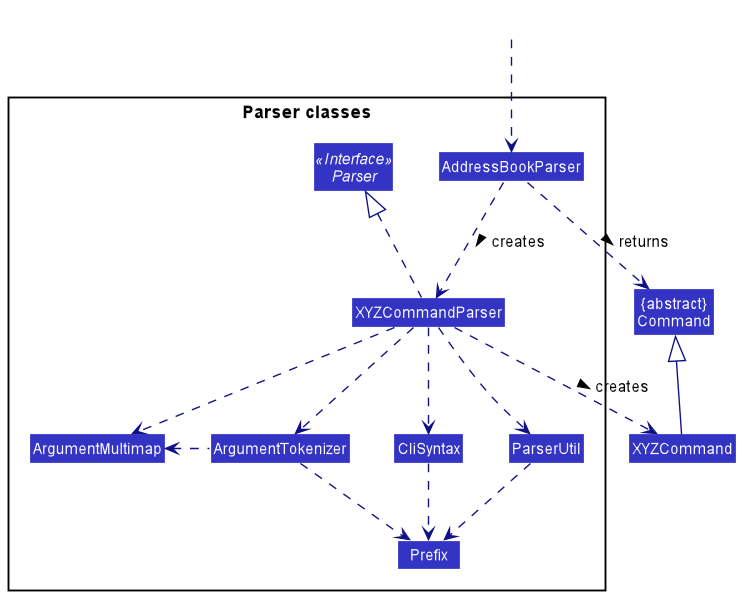
How the parsing works:
- When called upon to parse a user command, the
AddressBookParserclass creates anXYZCommandParser(XYZis a placeholder for the specific command name e.g.,AddCommandParser) which uses the other classes shown above to parse the user command and create aXYZCommandobject (e.g.,AddCommand) which theAddressBookParserreturns back as aCommandobject. - All
XYZCommandParserclasses (e.g.,AddCommandParser,DeleteCommandParser, …) inherit from theParserinterface so that they can be treated similarly where possible e.g, during testing.
Model component
API : Model.java
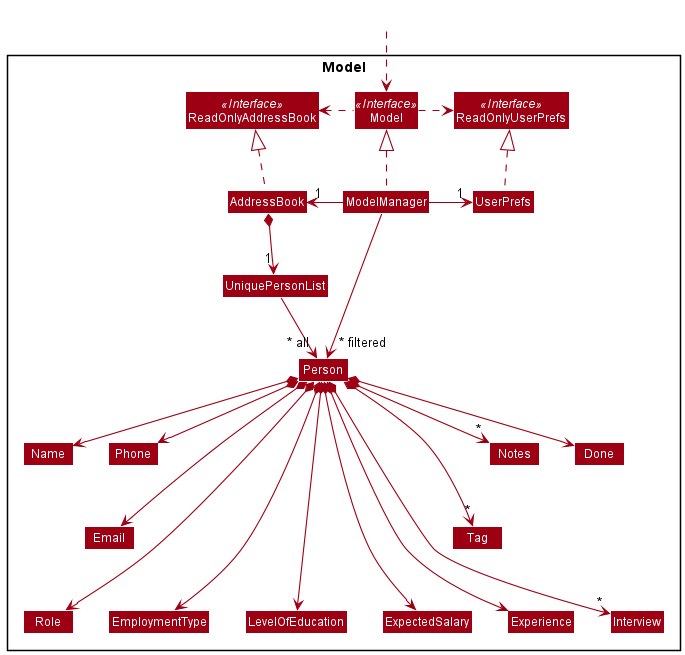
The Model component,
- stores the address book data i.e., all
Personobjects (which are contained in aUniquePersonListobject). - stores the currently ‘selected’
Personobjects (e.g., results of a search query) as a separate filtered list which is exposed to outsiders as an unmodifiableObservableList<Person>that can be ‘observed’ e.g. the UI can be bound to this list so that the UI automatically updates when the data in the list change. - stores a
UserPrefobject that represents the user’s preferences. This is exposed to the outside as aReadOnlyUserPrefobjects. - does not depend on any of the other three components (as the
Modelrepresents data entities of the domain, they should make sense on their own without depending on other components)
Tag list in the AddressBook, which Person references. This allows AddressBook to only require one Tag object per unique tag, instead of each Person needing their own Tag objects.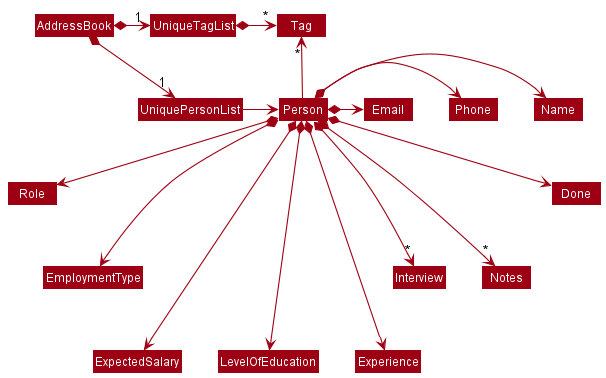
Storage component
API : Storage.java
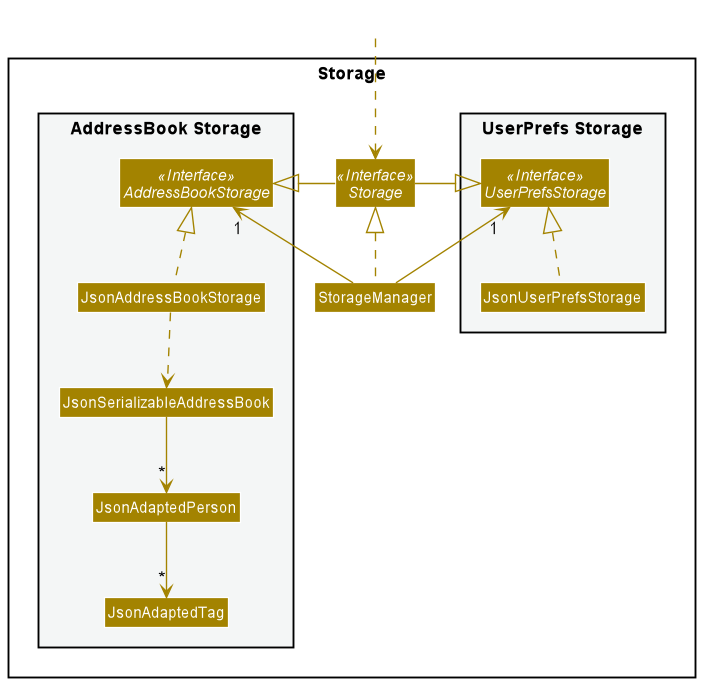
The Storage component,
- can save both address book data and user preference data in json format, and read them back into corresponding objects.
- inherits from both
AddressBookStorageandUserPrefStorage, which means it can be treated as either one (if only the functionality of only one is needed). - depends on some classes in the
Modelcomponent (because theStoragecomponent’s job is to save/retrieve objects that belong to theModel)
Common classes
Classes used by multiple components are in the seedu.addressbook.commons package.
Implementation
This section describes some noteworthy details on how certain features are implemented.
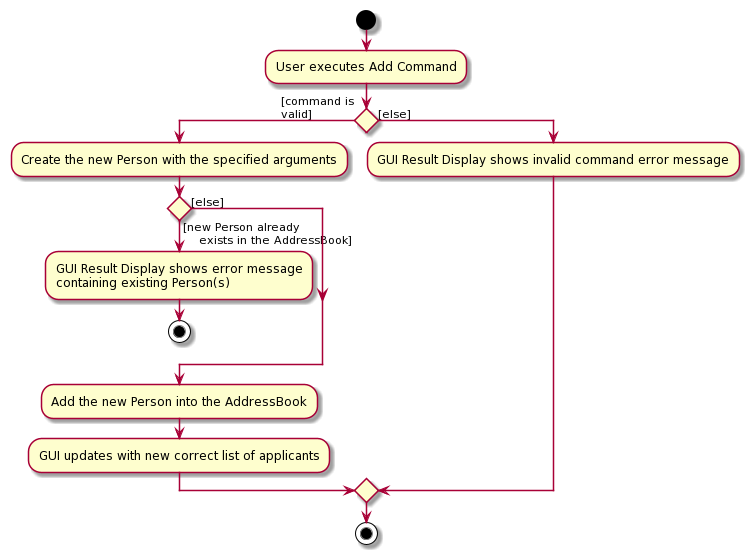
Add feature
The add command is facilitated by creating an AddCommand depending on the given input.
This command then updates the model accordingly.
The following activity diagram summarizes what happens when a user executes an add command:
Given below is an example usage scenario and how the add operation behaves at each step.
Step 1. A valid command add n/Dylan p/97998581 e/dylan.eyyou@gmail.com r/Pilot et/Full time s/3500 l/PhD y/4
is given as user input. This invokes LogicManager#execute(), which callsAddressBookParser#parseCommand() to parse
the input into command word add and command argument n/Dylan p/97998581 e/dylan.eyyou@gmail.com r/Pilot et/Full time s/3500 l/PhD y/4.
Step 2. AddCommandParser is initialized based on the parse results and AddCommandParser#parse() is called.
AddCommandParser#parse() then calls ArgumentTokenizer#tokenize() to obtain an ArgumentMultimap, which is
a mapping of all prefixes to their respective arguments (i.e. n/ to Dylan, p/ to 97998581, etc).
Step 3. AddCommandParser#arePrefixesPresent is then called to ensure all the mandatory prefixes have been inputted by the user.
After which, AddCommandParser#parse() then initializes a new Person with all the specified details from the input.
Step 4. AddCommandParser#parse() then initializes an AddCommand with the new Person as an argument. AddCommand#execute()
is then called, which calls Model#hasPerson() to ensure that the new Person is not a duplicate of any existing applicant in the
AddressBook.
Step 5. AddCommand#execute() then calls Model#addPerson() to add the new applicant in the AddressBook.
Step 6. CommandResult is initialized with String containing the details of the new applicant.
This CommandResult is then returned.
The following sequence diagram shows how the add operation works.
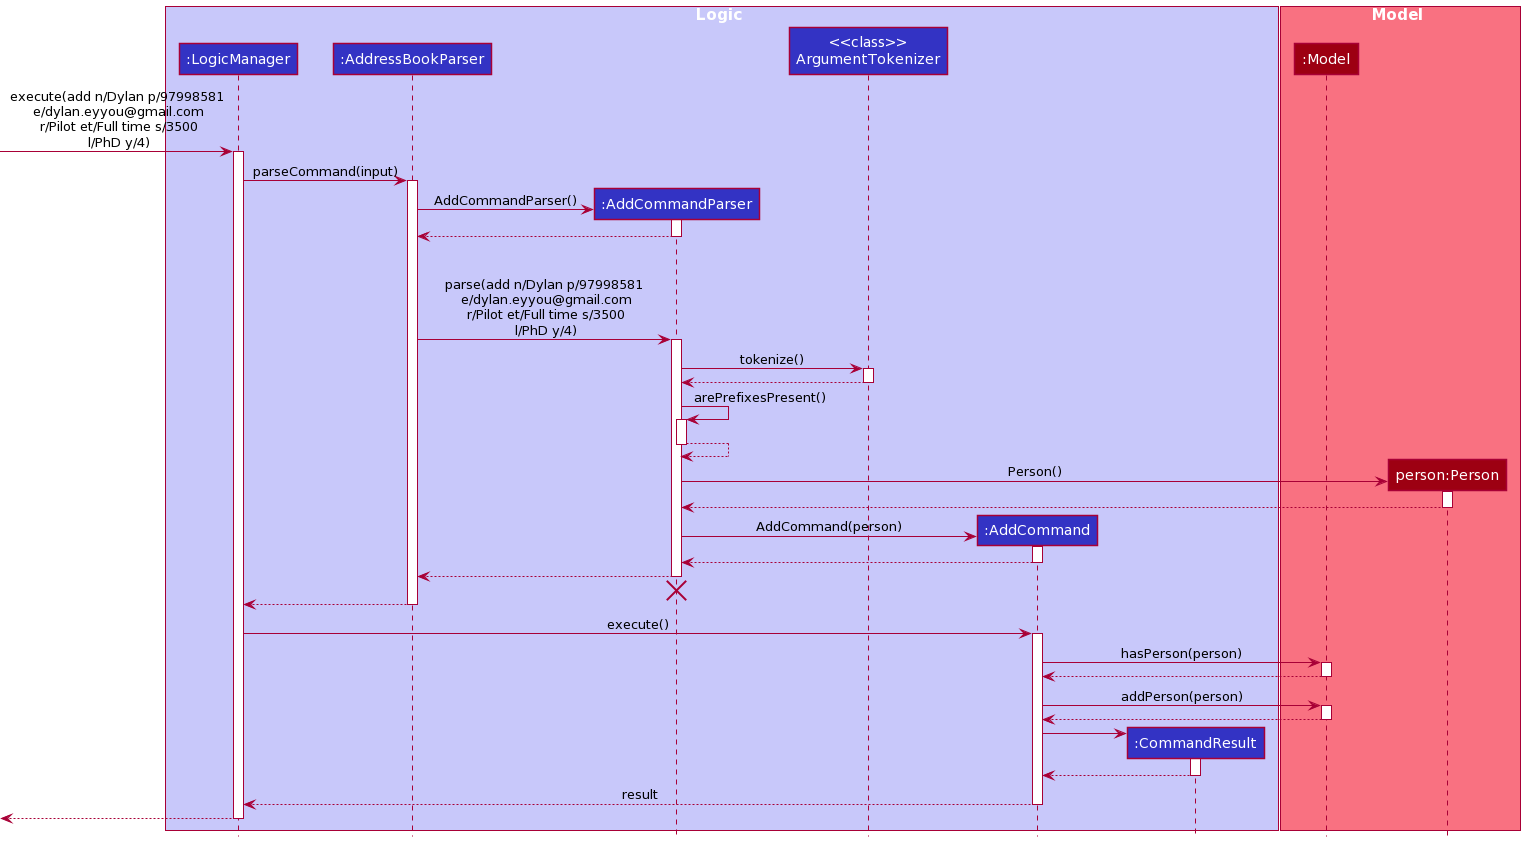
AddCommandParser
should not exceed the destroy marker X. This is a known limitation of PlantUML.Edit feature
The edit command is facilitated by creating an EditCommand depending on the given input.
This command then updates the model accordingly.
The following activity diagram summarizes what happens when a user executes an edit command:
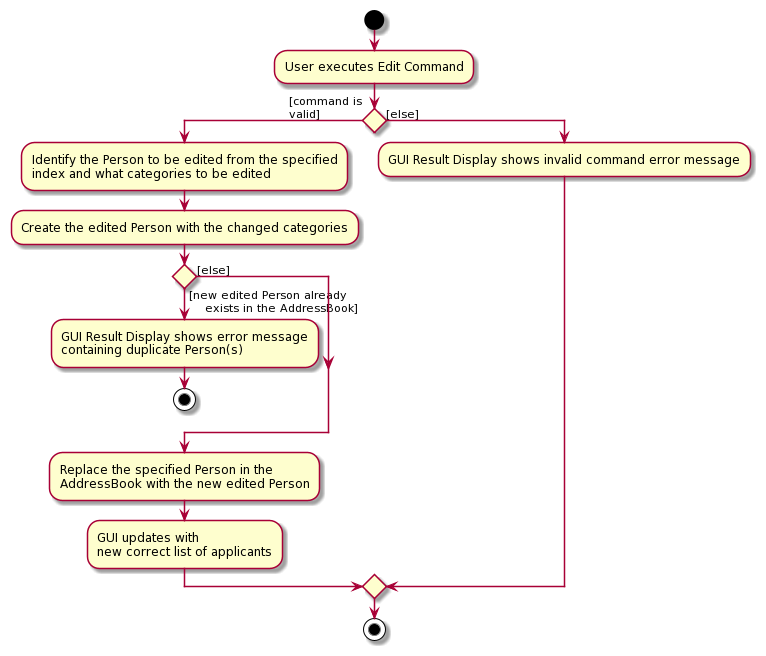
Given below is an example usage scenario and how the edit operation behaves at each step.
Step 1. A valid command edit 1 n/Ali is given as user input. This invokes LogicManager#execute(), which calls
AddressBookParser#parseCommand() to parse edit 1 n/Ali into command word edit and command argument 1 n/Ali.
Step 2. EditCommandParser is initialized based on the parse results and EditCommandParser#parse() is called.
EditCommandParser#parse() then calls ArgumentTokenizer#tokenize() to identify the Index of the person to be
edited from the preamble of the input (i.e. 1 in this case), as well as obtain an ArgumentMultimap of prefixes
to their respective arguments (i.e. mapping n/ to Ali).
Step 3. EditCommandParser#parse() then initializes an EditPersonDescriptor that stores the details to edit the person with.
Thus, EditPersonDescriptor#setName() will be called to store Ali as the Name to be edited to.
Step 4. EditCommandParser#parse() then initializes an EditCommand with the Index and EditPersonDescriptor as an argument.
EditCommand#execute() is then called, which creates a new Person and copies over the details to be edited
from the EditPersonDescriptor.
Step 5. After checking that the new Person is not a duplicate of any existing applicant in the AddressBook using Model#hasPerson(),
Model#setPerson() will be called to change the specified applicant in the AddressBook. Finally, Model#updateFilteredPersonList()
is called to reflect the changes in the list of applicants shown to the user.
Step 6. Once the list is updated, CommandResult is initialized with String containing the details of the edited applicants.
This CommandResult is then returned.
The following sequence diagram shows how the edit operation works.
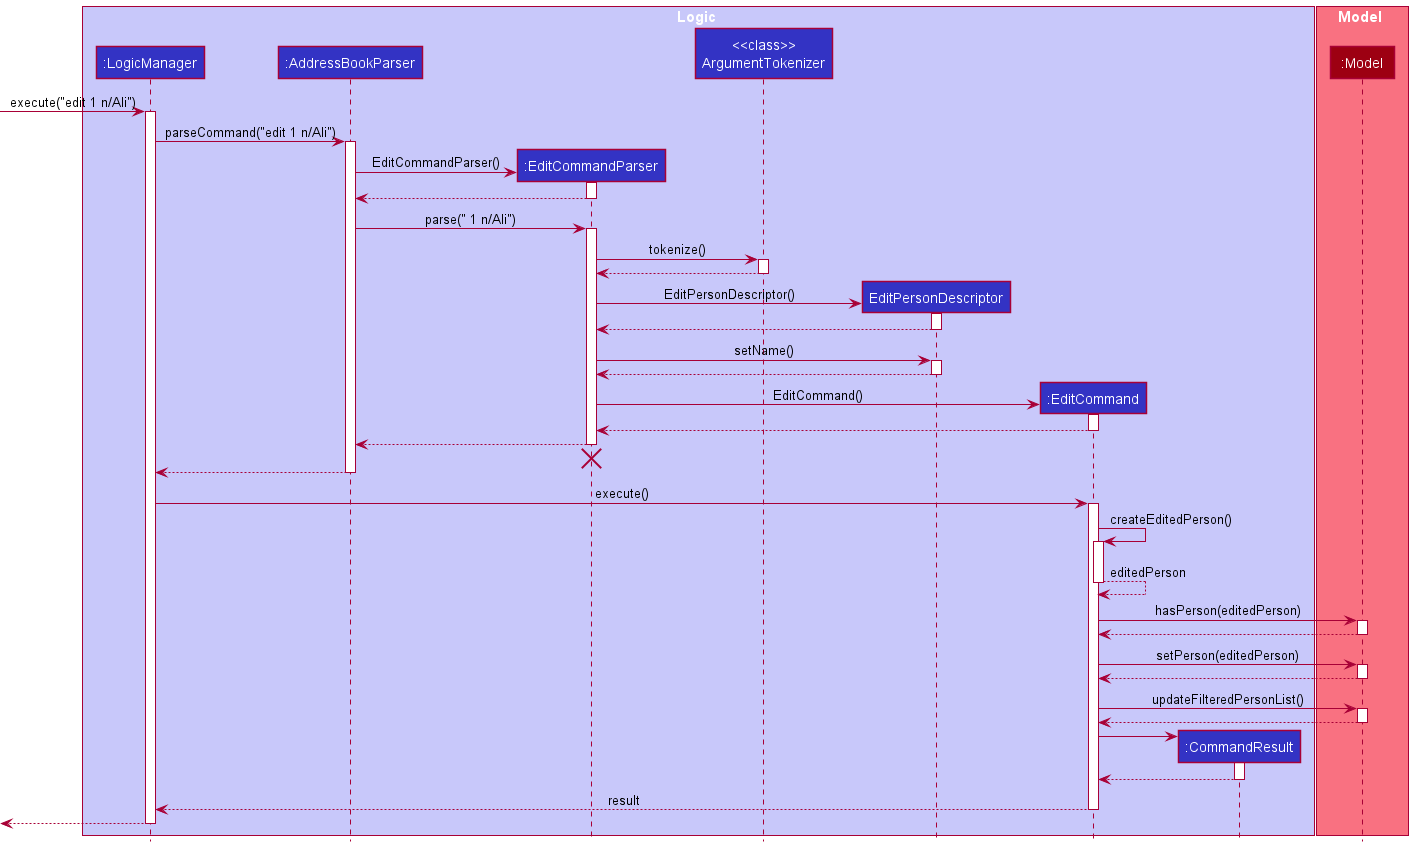
EditCommandParser
should not exceed the destroy marker X. This is a known limitation of PlantUML.Delete feature
The delete command is facilitated by creating a DeleteCommand depending on the given input.
This command then updates the model accordingly.
The following activity diagram summarizes what happens when a user executes an delete command:
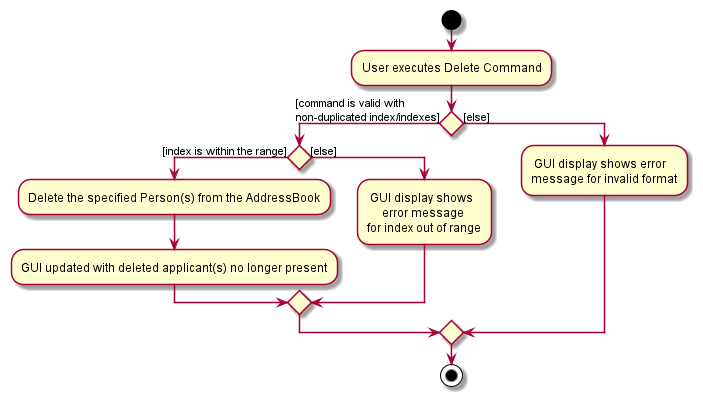
Given below is an example usage scenario illustrated by a sequence diagram for delete command.
Step 1. A valid command delete 1 is given as user input. This invokes LogicManager#execute(), which calls
AddressBookParser#parseCommand() to parse delete 1 into command word delete and command argument 1.
Step 2. DeleteCommandParser is initialized based on the parse results and DeleteCommandParser#parse() is called
to identify the indices present in 1. DeleteCommandParser#parse() then initializes a
DeleteCommand with the indices present as arguments.
Step 3. DeleteCommand#execute() is then called, which will check the validity of the given indices.
If there is no exception thrown, Model#deletePerson() is called to delete the applicants corresponding to the
given indices.
Step 4. CommandResult is initialized with String containing the details of the deleted applicant.
This CommandResult is then returned.
The following sequence diagram shows how the delete operation works.
DeleteCommandParser
should not exceed the destroy marker X. This is a known limitation of PlantUML.Find feature
The find command is facilitated by creating a FindCommand depending on the given
input. This command then updates the model accordingly.
The following activity diagram summarizes what happens when a user executes a find command:
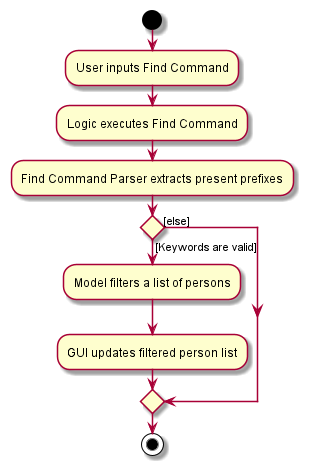
Given below is an example usage scenario illustrated by a sequence diagram for find command.
Step 1. A valid command find n/Alex y/0 is given as user input. This invokes LogicManager#execute(), which calls
AddressBookParser#parseCommand() to parse find n/Alex y/0 into command word find and command argument n/Alex y/0.
Step 2. FindCommandParser is initialized based on the parse results and FindCommandParser#parse() is called
to identify the predicates present in ` n/Alex y/0. FindCommandParser#parse() then initializes a
FindCommand` with the predicates as argument.
Step 3. FindCommand#execute() is then called, which will in turn call Model#updateFilteredPersonList()
and filters for applicants that have Alex in their names and 0 year of experience.
Step 4. Once the string of all applicant names is formed, CommandResult is initialized with this string as argument
and returned.
The following sequence diagram shows how the find operation works.
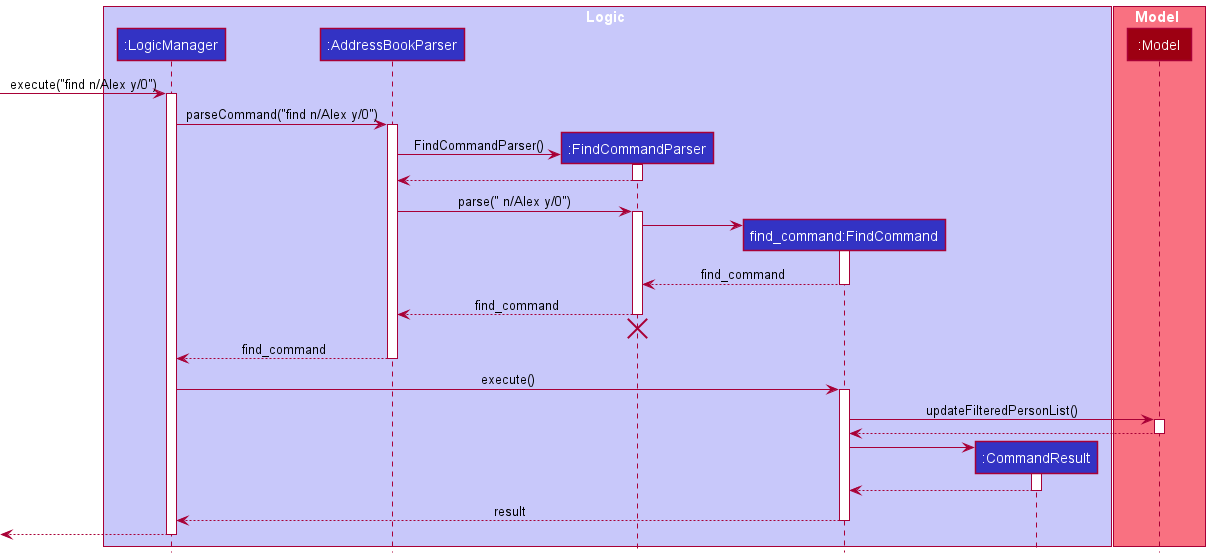
FindCommandParser
should not exceed the destroy marker X. This is a known limitation of PlantUML.Design considerations for find:
Aspect: Finding by each prefix:
-
Alternative 1 (current choice): Implement different finding conditions for different prefixes.
- For example:
-
Role: An applicant can be matched by
roleif all parameters afterr/are present in hisrole. -
Employment Type: An applicant can be matched by
employment_typeif hisemployment_typestarts with any of theemployment_typeparameters, and the parameter matches with an existing storedemployment_type. -
Years of Experience: An applicant can be matched by
years_of_experienceif he has ayears_of_experiencenot lesser than theyear_of_experienceparameter. - For detailed explanations of find parameters of each prefix, please visit the section of our User Guide - Find Parameters.
-
Role: An applicant can be matched by
- Pros:
Conditions to check for a match in parameters are differentiated for each prefix to allow better usability of the
findcommand. For example, it might be more intuitive to search for a specific expected salary within a range, rather than the exact number. - Cons: May be hard for users to remember the specifications.
- For example:
-
Alternative 2 : Use the same finding conditions for different prefixes.
- Pros: Users do not need to remember the differences. Easier to use and not likely to cause confusions.
- Cons: If users could not remember the stored data, they might want to search vaguely.
Filter interview feature
The filter_interview command is facilitated by extending an abstract FilterInterviewCommand class, and executing the appropriate
subclass depending on the given input. This command then updates the model accordingly.
The following activity diagram summarizes what happens when a user executes a filter_interview command:
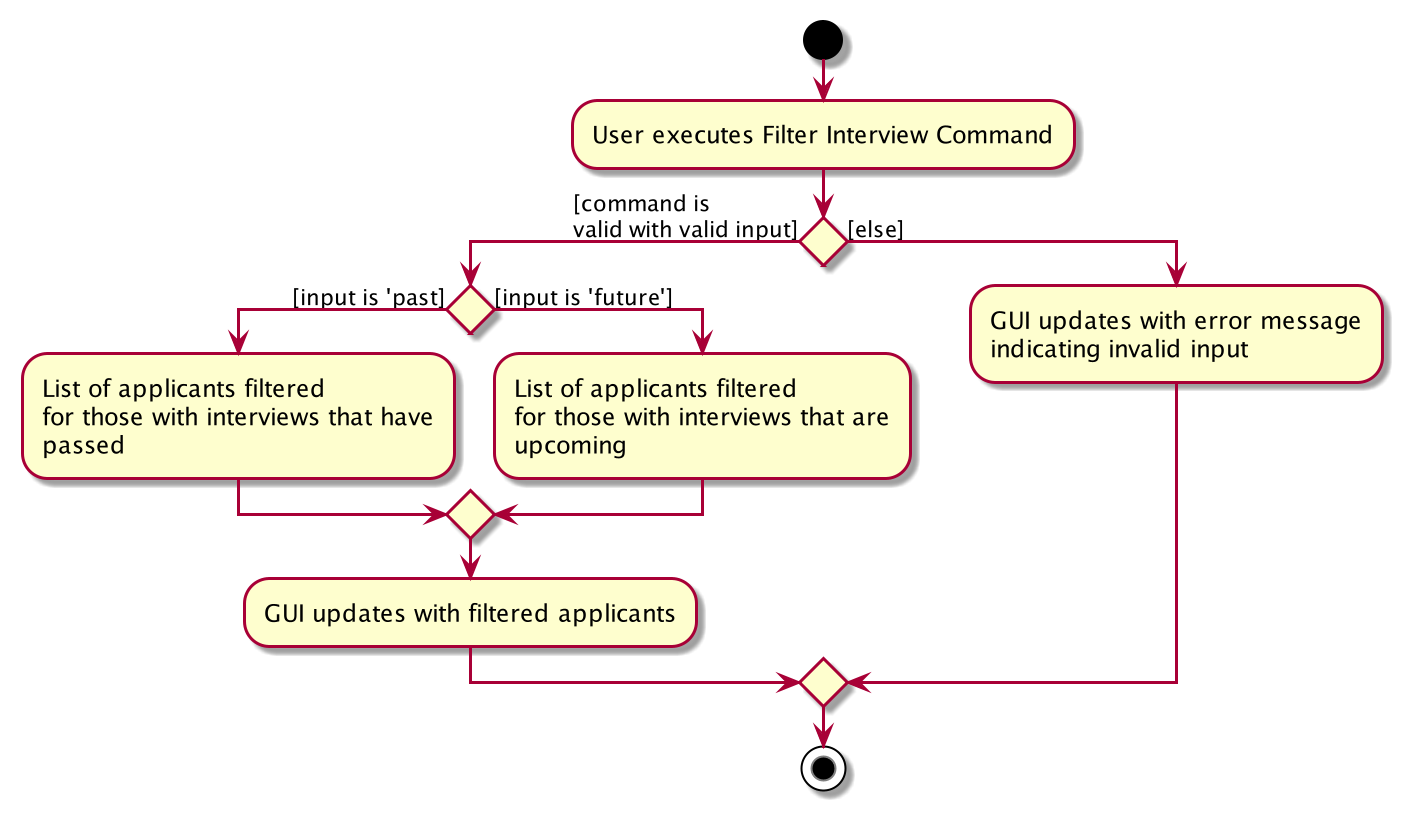
Given below is an example usage scenario and how the filter interview operation behaves at each step.
Step 1. A valid command filter_interview past is given as user input. This invokes LogicManager#execute(), which calls
AddressBookParser#parseCommand() to parse filter_interview past into command word filter_interview and command argument past.
Step 2. FilterInterviewCommandParser is initialized based on the parse results and FilterInterviewCommandParser#parse() is called
to identify the user input past.
Step 3. Upon identifying the user input past, FilterInterviewCommandParser#parse will then call methods of the
ValidFilterInterviewArgs class from the enum type ValidFilterInterviewArgs.PAST instead of ValidFilterInterviewArgs.FUTURE.
The details of this step are omitted from the sequence diagram below for brevity.
Step 4. FilterInterviewCommandParser#parse calls the method ValidFilterInterviewArgs#getFilterInterviewCommand() to obtain
an object of the appropriate subclass of FilterInterviewCommand, which in this case is an instance of FilterInterviewPastCommand.
This instance is returned and propagated back to LogicManager.
Step 5. FilterInterviewPastCommand#execute() is then called by LogicManager, which will in turn call Model#updateFilteredPersonList()
and filters for applicants that have interviews that have already passed.
Step 6. Once the list has been filtered, CommandResult is initialized with String indicating how many applicants
have interviews that have passed. This CommandResult is then returned.
The following sequence diagram shows how the filter interview operation works.
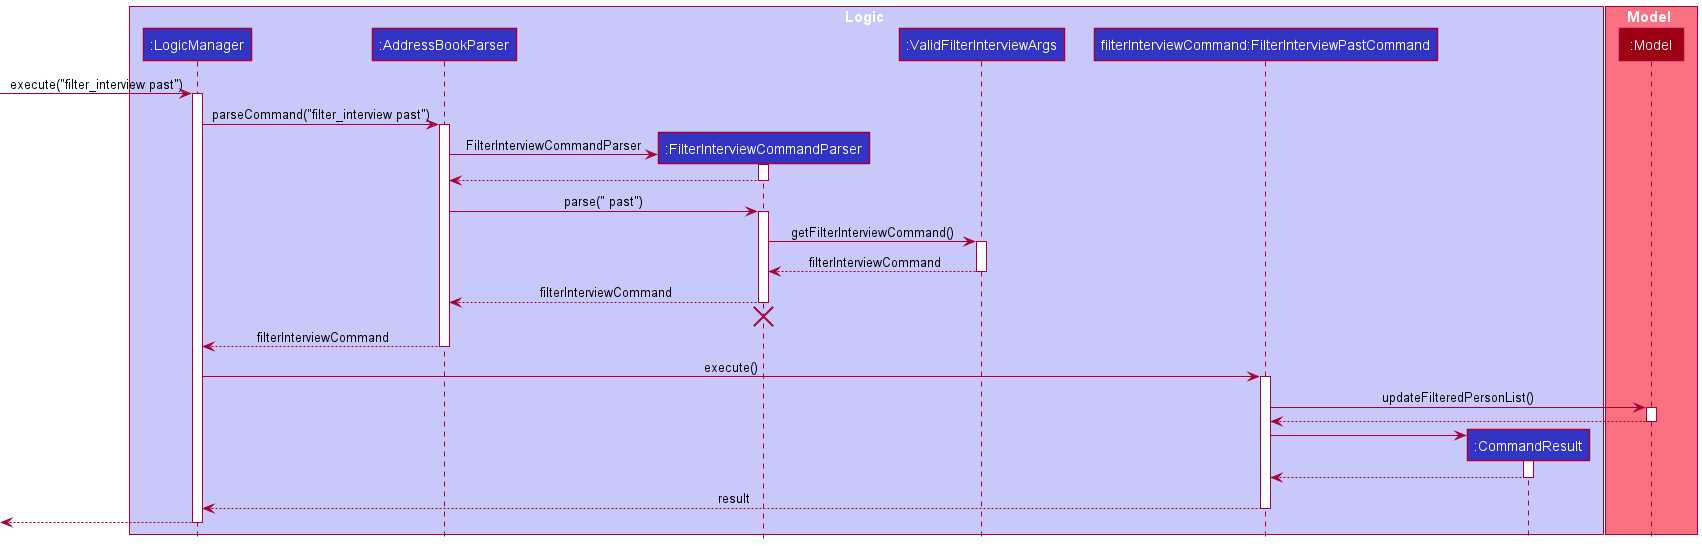
FilterInterviewCommandParser
should not exceed the destroy marker X. This is a known limitation of PlantUML.Design considerations for filter interview:
Aspect: User command to use in filtering interviews:
-
Alternative 1 (current choice): Separate command for filtering interviews
- Pros: Command has single responsibility of filtering interviews based on whether they haved passed or are upcoming.
- Pros: Easy to use for user, only has two inputs it can take.
- Cons: Harder to implement than adding to
findcommand. - Cons: User might be confused between
findcommand for interviews andfilter_interviewcommand.
-
Alternative 2: Part of
findcommand functionality- Pros: Easy to implement
- Pros: Intuitive for user to use
findcommand to find certain types of interviews (past or future) - Cons: Breaks the single responsibility principle as it does not find a specific input for a prefix, but rather types of inputs.
Show feature
The show command is facilitated by creating an ObservableList of Person objects from the
AddressBook. A List of unique String objects is created, with String content depending on
the prefix provided by the user.
The following activity diagram summarizes what happens when a user executes a show command:
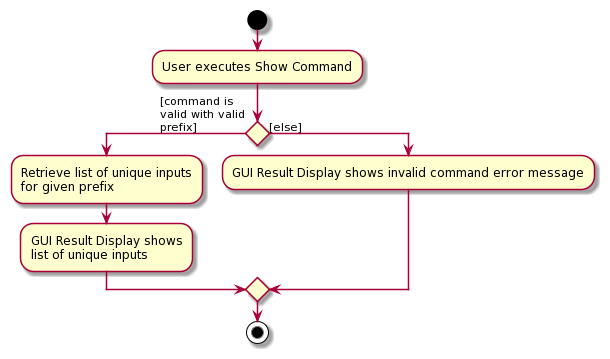
Given below is an example usage scenario and how the show operation behaves at each step.
Step 1. A valid command show n/ is given as user input. This invokes LogicManager#execute(), which calls
AddressBookParser#parseCommand() to parse show n/ into command word show and command argument n/.
Step 2. ShowCommandParser is initialized based on the parse results and ShowCommandParser#parse() is called
to identify the first prefix in the user input n/. ShowCommandParser#parse() then initializes a
ShowCommand with the first prefix Name as argument.
Step 3. ShowCommand#execute() is then called, which will first obtain a ReadOnlyAddressBook from Model, from which
the ObservableList<Person> belonging to the ReadOnlyAddressBook is obtained. The names of each applicant within
the ObservableList<Person> is then accumulated to form a string of all applicant names.
Step 4. Once the string of all applicant names is formed, CommandResult is initialized with this string as argument
and returned.
The following sequence diagram shows how the show operation works.
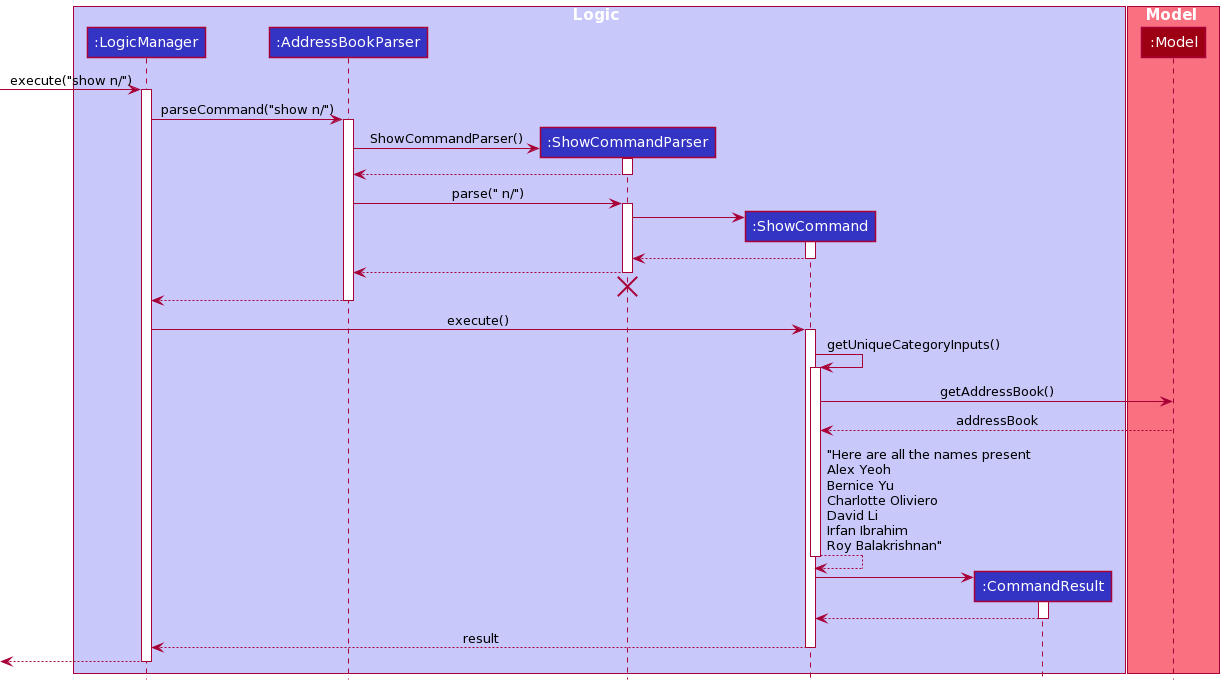
ShowCommandParser
should not exceed the destroy marker X. This is a known limitation of PlantUML.Design considerations for show:
Aspect: Finding search terms:
-
Alternative 1 (current choice): Sort unique search terms into a list.
- Pros: List of search terms follows an order defined by us that would make it easier for the user to find the search term they are looking for, especially when there are a lot of search terms.
- Pros: Testability improves as
ShowCommand#getUniqueCategoryInputs()will return a list with an order defined by us, making it easier for us to craft test cases - Cons: Runtime complexity will increase to
O(n log n)rather thanO(n)due to extra performance costs of sorting the search terms.
-
Alternative 2: Not sorting unique search terms and collecting as a set.
- Pros: Runtime complexity stays at
O(n). The show command will be more efficient than using Alternative 1. - Cons: List of search terms returned is in an order not defined by us, which could make it difficult for the users to find the search term they are looking for.
- Cons: There is no general guarantee on the ordering of elements obtained by iterating over a set. This leads to lower testability as it is difficult to create test cases if the result of the method is difficult to determine.
- Pros: Runtime complexity stays at
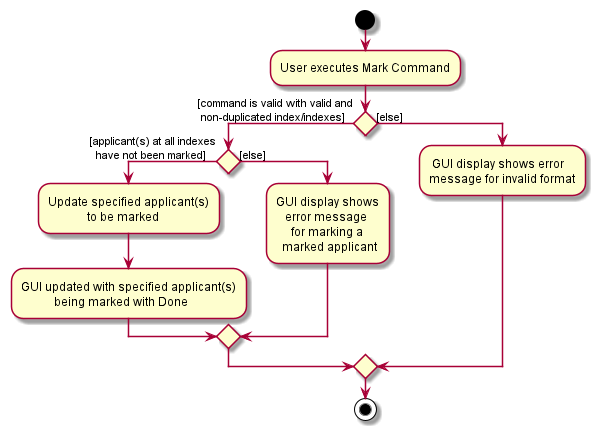
Mark feature
The mark command is facilitated by creating a MarkCommand, which is a subclass of MarkingCommand.
This command then updates the model accordingly, depending on the given input.
The following activity diagram summarizes what happens when a user executes a mark command:
Given below is an example usage scenario illustrated by a sequence diagram for mark command.
Step 1. A valid command mark 1 2 is given as user input. This invokes LogicManager#execute(), which calls
AddressBookParser#parseCommand() to parse mark 1 2 into command word mark and command argument 1 2.
Step 2. MarkingCommandParser is initialized based on the parse results and MarkingCommandParser#parse() is called
to identify the indices present in 1 2. MarkingCommandParser#parse() then initializes a
MarkCommand with the indices present as arguments.
Step 3. MarkCommand#execute() is then called, which will in turn call Model#checkForMarkedPerson() on the applicants
corresponding to the given indices. If there is no exception thrown, Model#markPerson() is called to mark the
applicants corresponding to the given indices.
Step 4. CommandResult is initialized with String containing the details of the newly marked applicants.
This CommandResult is then returned.
The following sequence diagram shows how the mark operation works.

MarkingCommandParser
should not exceed the destroy marker X. This is a known limitation of PlantUML.Unmark feature
The unmark command is facilitated by creating an UnmarkCommand, which is a subclass of
MarkingCommand. This command then updates the model accordingly, depending on the given input.
The following activity diagram summarizes what happens when a user executes an unmark command:

Given below is an example usage scenario illustrated by a sequence diagram for unmark command.
Step 1. A valid command unmark 3 is given as user input. This invokes LogicManager#execute(), which calls
AddressBookParser#parseCommand() to parse unmark 3 into command word unmark and command argument 3.
Step 2. MarkingCommandParser is initialized based on the parse results and MarkingCommandParser#parse() is called
to identify the indices present in 3. MarkingCommandParser#parse() then initializes a
UnmarkCommand with the indices present as arguments, which in this case is a single index 3.
Step 3. UnmarkCommand#execute() is then called, which will in turn call Model#checkForUnmarkedPerson() on the applicants
corresponding to the given indices. If there is no exception thrown, Model#unmarkPerson() is called to unmark the applicants corresponding to the given indices.
Step 4. CommandResult is initialized with String containing the details of the newly unmarked applicants.
This CommandResult is then returned.
The following sequence diagram shows how the unmark operation works.
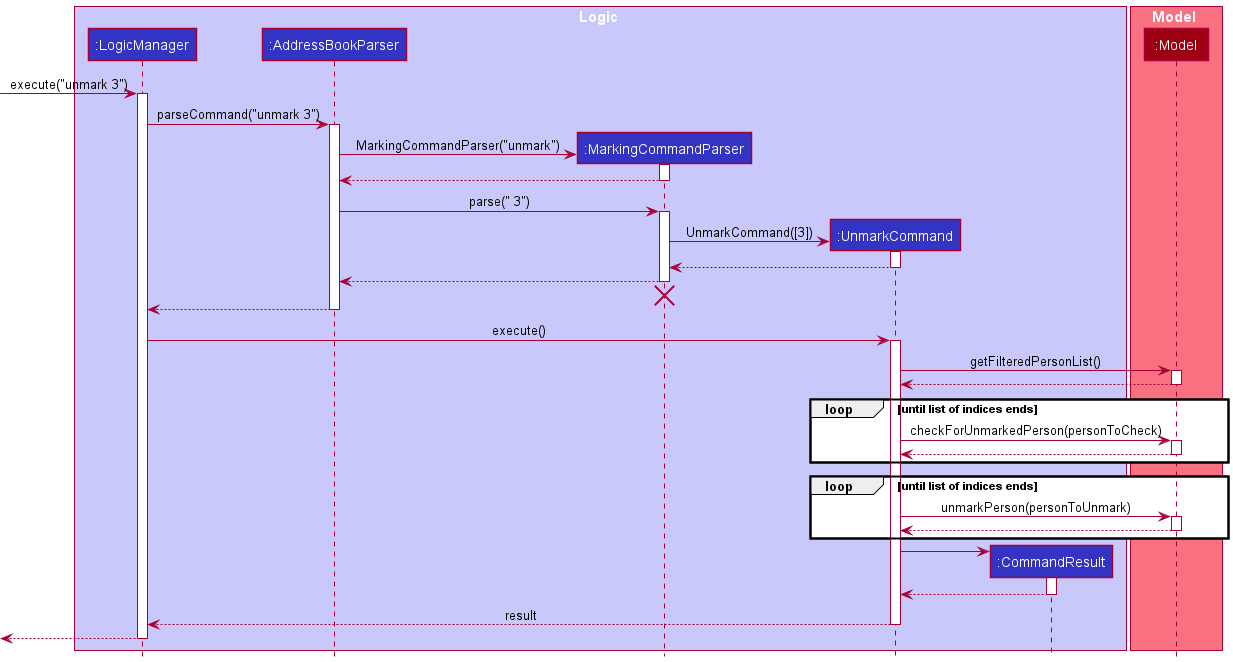
MarkingCommandParser
should not exceed the destroy marker X. This is a known limitation of PlantUML.Design considerations for mark and unmark:
Aspect: User command to use in marking and unmarking applicants:
-
Alternative 1 (current choice): Separate command for
markandunmark- Pros: Command has single responsibility of marking or unmarking applicants.
- Pros: Easy and intuitive to use for user, does not take any additional input to differentiate the two commands from each other.
- Cons: Certain amount of repeat in code for both mark and unmark commands.
-
Alternative 2: Implement both
markandunmarkas one singular command- Pros: Reduces code duplication in implementation.
- Cons: Breaks the single responsibility principle as marking does a relatively different task from unmarking.
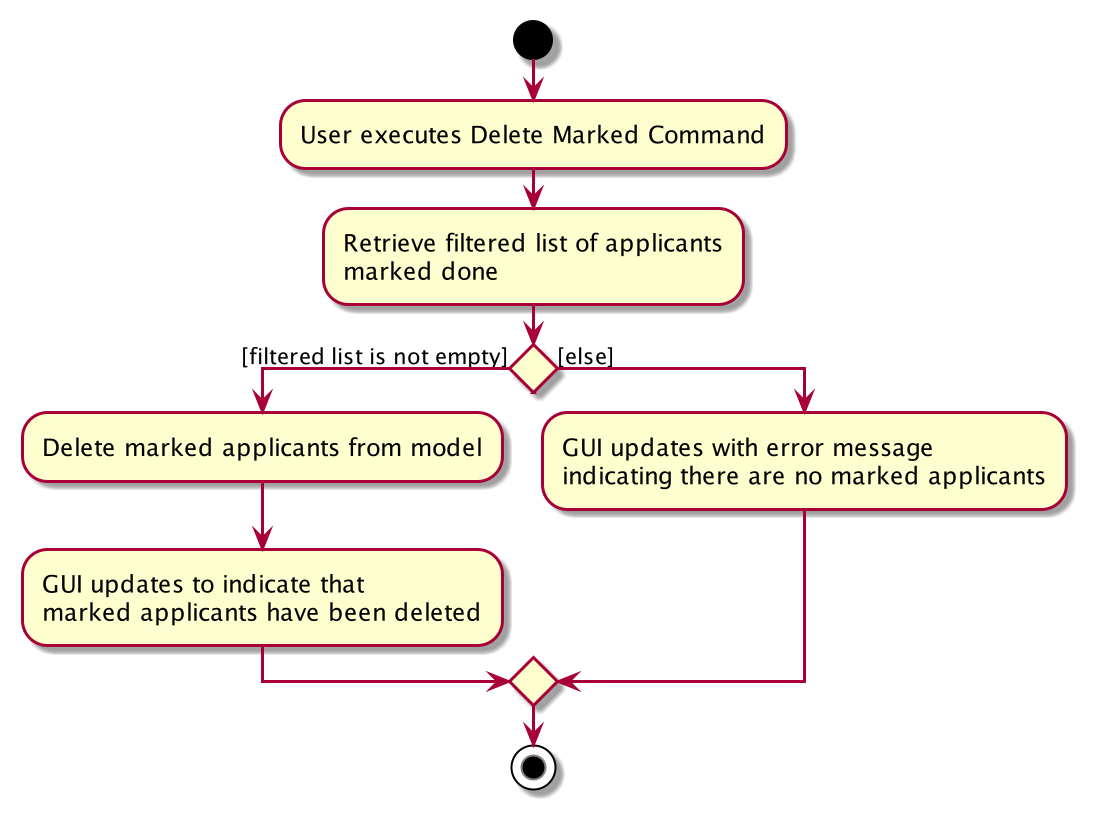
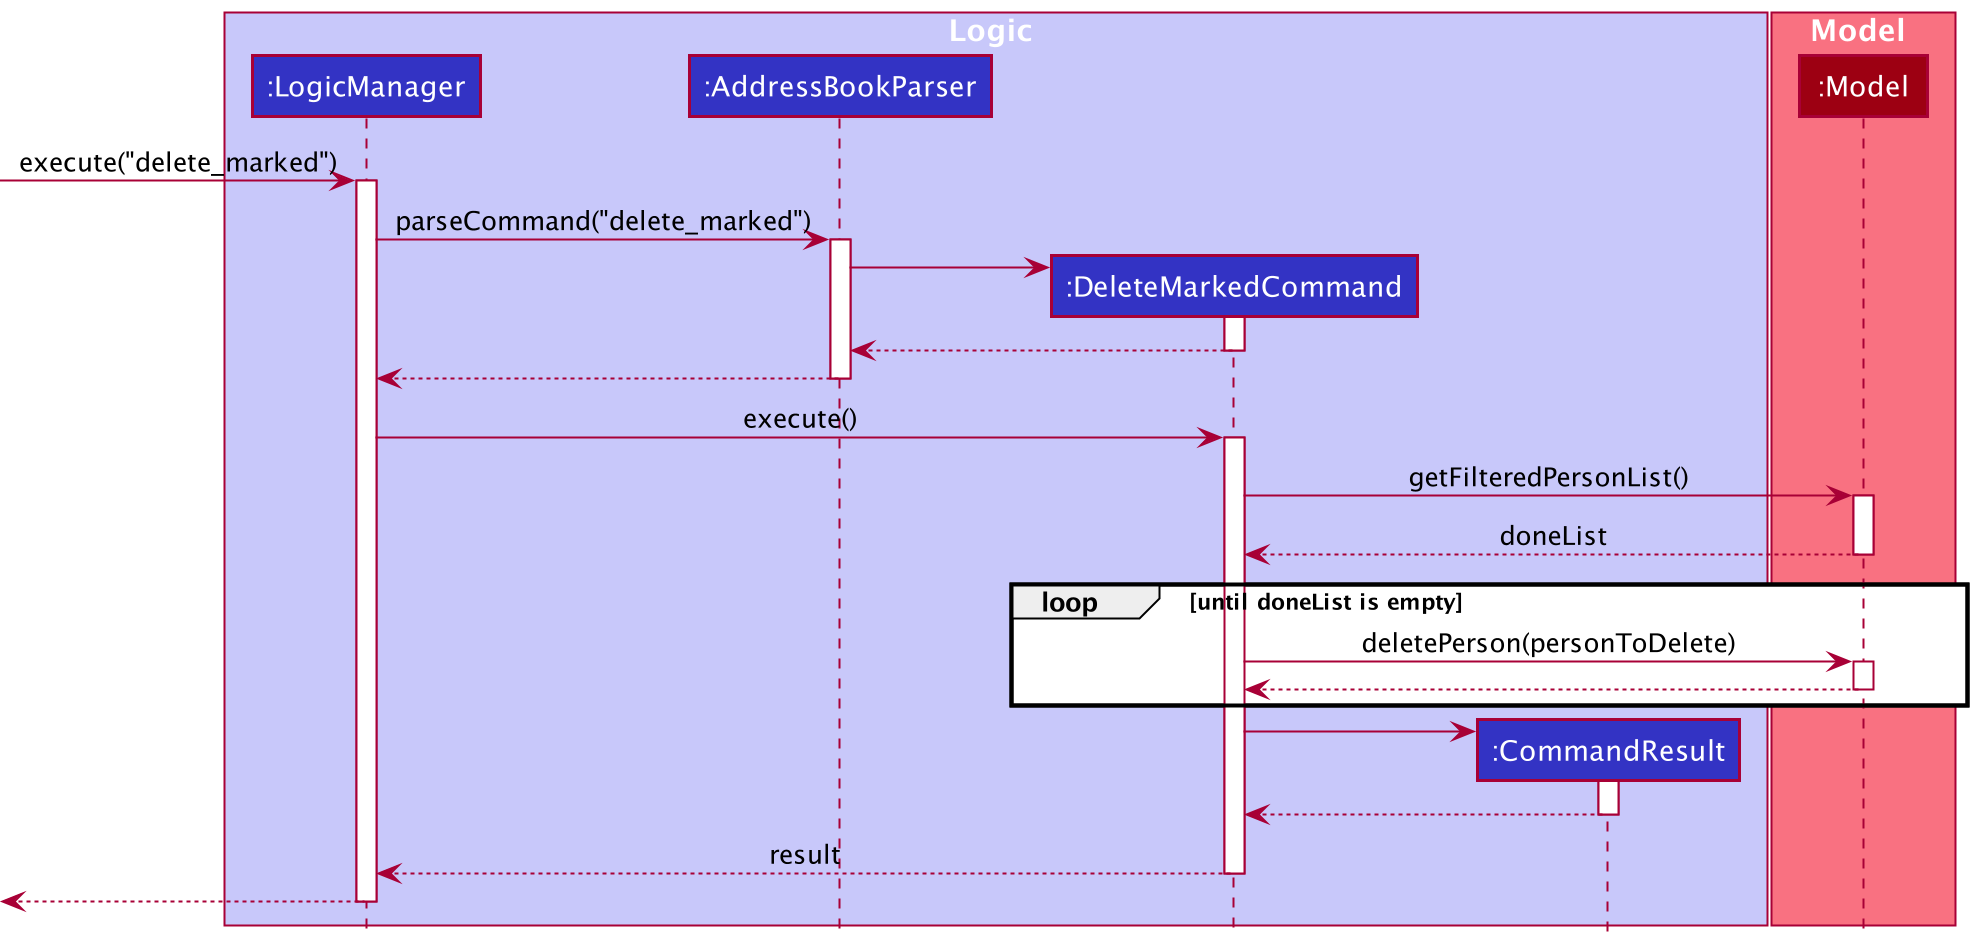
Delete marked feature
The delete_marked command is facilitated by creating an DeleteMarkedCommand.
This command then updates the model accordingly.
The following activity diagram summarizes what happens when a user executes a delete_marked command:
Given below is an example usage scenario illustrated by a sequence diagram for delete_marked command.
Step 1. A valid command delete_marked is given as user input. This invokes LogicManager#execute(), which calls
AddressBookParser#parseCommand() to parse delete_marked.
Step 2. AddreddBookParser#parseCommand() initializes a DeleteMarkedCommand.
Step 3. DeleteMarkedCommand#execute() is then called, which will in turn call Model#updateFilteredList() (not shown) to
update list for applicants marked then Model#getFilteredList() is then called to retrieve this list.
Step 4. Model#deletePerson() is called on applicants in the list to delete them.
Step 5. Once the string of all applicant names that are marked is formed, CommandResult is initialized with this string as argument
and returned.
The following sequence diagram shows how the delete marked operation works.
Design considerations for delete marked:
Aspect: User command to use in deleting marked applicants:
-
Alternative 1 (current choice): Separate command for deleting marked applicants
- Pros: Command has single responsibility of deleting marked applicants based.
- Pros: Easy to use for user, does not take any additional input.
- Cons: User might be confused between
deletecommand for general deletion anddelete_markedcommand.
-
Alternative 2: Part of
deletecommand functionality- Pros: Intuitive for user to use
deletecommand for all deletion purposes - Cons: Breaks the single responsibility principle as deleting marked applicants does not delete applicants at specific indices
like the rest of the
deletecommand, but rather a certain group of applicants at once.
- Pros: Intuitive for user to use
Datetime for interview
The Interview class accepts yyyy-M-d, H:m as parsed time format and provides MMM dd yyyy , HH:mm as display format.
-
yyyy: year-of-era in 4 digits, e.g.2021 -
M: month-of-year, e.g.7,07 -
d: day-of-month, e.g.10 -
H: hour-of-day (0-23), e.g.0 -
m: minute-of-hour, e.g.30
Interview#isValidInterviewTime uses java.time.format.DateTimeFormatter to generate a formatter using Interview#PARSE_FORMAT,
and checks for DateTimeParseException when parsing the input with the formatter via LocalDate#parse().
The display() method uses java.text.DateFormat and returns the formatted time which is displayed GUI.
For example, the add command add n/John ... i/2021-01-01, 10:30 will add a person John with interview time shown as Jan 01 2021, 10:30.
Documentation, logging, testing, configuration, dev-ops
Appendix A: Requirements
Product scope
Target user profile: A recruiter that
- can type fast
- prefers typing to mouse interactions
- prefer desktop apps over other types
- is reasonably comfortable using CLI apps
- has a need to manage a significant number of applications
- works for a company that gets applications for variety of roles
- has a need to filter and categorize applicants by different fields
Value proposition:
It can be hard for recruiters to keep track of the plethora of clients with different skill sets, availability and experience.
This product will make recruiters’ lives easier through categorisation and filter features to easily access candidates they have in mind. Recruiters can manage contacts faster than a typical mouse/GUI driven app.
User stories
Priorities: High (must have) - * * *, Medium (nice to have) - * *, Low (unlikely to have) - *
| Priority | As a … | I want to … | So that I can… |
|---|---|---|---|
* * * |
new user | see usage instructions | refer to instructions when I forget how to use the App |
* * * |
user | list all applicants | keep track of all my applicants |
* * * |
user | add an applicant | update my list of applicants with new people |
* * * |
user | delete an applicant | remove applicants I no longer need |
* * * |
user | edit an applicant’s information | update their information without having to delete and add them again |
* * * |
user | find applicants by their name | locate details of applicants without having to go through the entire list |
* * * |
user | find applicants by their phone number | locate details of applicants without having to go through the entire list |
* * * |
user | find applicants by their email | locate details of applicants without having to go through the entire list |
* * * |
user | find applicants by their applied roles | filter out applicants that match the desired role |
* * * |
user | find applicants by their employment type | filter out applicants that match the desired employment type |
* * * |
user | find applicants by their expected salary | filter out applicants that match the desired salary range of the hiring company |
* * * |
user | find applicants by their level of education | filter out applicants that match the desired highest level of education |
* * * |
user | find applicants by their years of experience | filter out applicants that match the desired years of experience |
* * * |
user | find applicants by their tags | filter out applicants that match the desired tags |
* * * |
user | find applicants by their interview time | filter out applicants that match the desired interview times |
* * * |
user | find applicants by their notes | filter out applicants that match the desired note |
* * * |
user | find applicants by their done status | filter out applicants that match the desire done status |
* * * |
user | mark applicants as “Done” | know which applicants I have attended to |
* * * |
user | unmark applicants from “Done” to “Not Done” | reflect the correct current status I have with the applicant |
* * * |
user | save applicant data | refer to it in the future without having to type in their data again |
* * * |
user | exit the application | so that I can end my session without having to force close the application by clicking the red X at the top right. |
* * |
user | see all names available in the list | check easily if a certain name is present in the list without having to go through the entire list |
* * |
user | see all phone numbers available in the list | check easily if a certain number is present in the list without having to go through the entire list |
* * |
user | see all emails available in the list | check easily if a certain email is present in the list without having to go through the entire list |
* * |
user | see all applied roles available in the list | check easily if a certain role is present in the list without having to go through the entire list |
* * |
user | see all employment types available in the list | check easily if a certain employment type is present in the list without having to go through the entire list |
* * |
user | see all expected salaries available in the list | check easily if a certain expected salary is present in the list without having to go through the entire list |
* * |
user | see all interview times available in the list | check easily if a certain interview time is present in the list without having to go through the entire list |
* * |
user | see all tags available in the list | check easily if a certain tag is present in the list without having to go through the entire list |
* * |
user | delete multiple applicants at once | so that I can delete applicants more efficiently |
* * |
user | delete all applicants that are marked as done | so that I can focus only on applicants that I have not worked on, and easily reduce clutter in the address book |
* * |
user | clear all applicants | so that I can save time clearing all data without having to manually input every single applicant via a delete command |
* * |
user | find applicants with interviews that have passed | so that I can easily see and keep track of the applicants with passed interviews |
* * |
user | find applicants with interviews that are upcoming | so that I can easily see and keep track of the applicants with upcoming interviews |
Use cases
(For all use cases below, the System is RecruitIn and the Actor is the user, unless specified otherwise)
Use case: UC01 - Asking for help
MSS
- User requests for help to use RecruitIn.
-
RecruitIn informs user on how to access user guide.
Use case ends.
Extensions
-
2a. User cancels request for help.
Use case ends.
Use case: UC02 - List all applicants
MSS
- User requests to list all applicants.
-
RecruitIn shows a list of all applicants.
Use case ends.
Use case: UC03 - Adding an applicant
MSS
- User requests to add an applicant with provided information.
-
RecruitIn adds the applicant to the storage.
Use case ends.
Extensions
- 1a. The input format is invalid.
-
1a1. RecruitIn shows an error message.
Use case resumes at step 1.
-
- 1b. The applicant that the user is trying to add is a duplicate of an applicant that already exists in the storage.
-
1b1. RecruitIn shows an error message.
Use case resumes at step 1.
-
Use case: UC04 - Editing an applicant
MSS
- User requests to edit an applicant with provided information.
-
RecruitIn edits the applicant in the storage.
Use case ends.
Extensions
- 1a. The input format is invalid.
-
1a1. RecruitIn shows an error message.
Use case resumes at step 1.
-
- 1b. The newly edited applicant is a duplicate of an applicant that already exists in the storage.
-
1b1. RecruitIn shows an error message.
Use case resumes at step 1.
-
Use case: UC05 - Deleting an applicant
MSS
- User requests to list applicants (UC01).
- RecruitIn displays a list of applicants.
- User requests to delete applicant(s) in the displayed list.
-
RecruitIn deletes the applicant(s).
Use case ends.
Extensions
-
1a. User requests to find applicant (UC06).
Use case resumes at step 2.
-
2a. The list of applicants is empty.
Use case ends.
-
3a. The input format is invalid.
-
3a1. RecruitIn shows an error message.
Use case resumes at step 2.
-
Use case: UC06 - Finding an applicant
MSS
- User requests to find an applicant with the provided information.
-
RecruitIn displays the applicants that match the provided information.
Use case ends.
Extensions
- 1a. The input format is invalid.
-
1a1. RecruitIn shows an error message.
Use case resumes at step 1.
-
-
2a. The list of applicants is empty.
Use case ends.
Use case: UC07 - Filtering applicants by passed interviews
MSS
- User requests to list applicants (UC01).
- RecruitIn displays a list of applicants.
- User requests to find all applicants with interviews that have already passed.
-
RecruitIn displays the applicants with interviews that have already passed.
Use case ends.
Extensions
-
1a. User requests to find applicant (UC06).
Use case resumes at step 2.
-
2a. The list of applicants is empty.
Use case ends.
-
3a. The input format is invalid.
-
3a1. RecruitIn shows an error message.
Use case resumes at step 2.
-
Use case: UC08 - Filtering applicants by upcoming interviews
MSS
- User requests to list applicants (UC01).
- RecruitIn displays a list of applicants.
- User requests to find all applicants with upcoming interviews in the future.
-
RecruitIn displays the applicants with upcoming interviews in the future.
Use case ends.
Extensions
-
1a. User requests to find applicant (UC06).
Use case resumes at step 2.
-
2a. The list of applicants is empty.
Use case ends.
-
3a. The input format is invalid.
-
3a1. RecruitIn shows an error message.
Use case resumes at step 2.
-
Use case: UC09 - Showing search terms
MSS
- User requests to show search terms for a specific category.
-
RecruitIn displays a list of search terms for the requested category.
Use case ends.
Extensions
- 1a. The input format is invalid.
-
1a1. RecruitIn shows an error message.
Use case resumes at step 1.
-
-
2a. The list of applicants is empty.
-
2a1. RecruitIn displays a message indicating that no search terms are available.
Use case ends.
-
Use case: UC10 - Marking an applicant
MSS
- User requests to list applicants (UC01).
- RecruitIn displays a list of applicants.
- User requests to mark applicant(s) in the displayed list.
-
RecruitIn marks the requested applicant(s) to “Done”.
Use case ends.
Extensions
-
1a. User requests to find applicant (UC06).
Use case resumes at step 2.
-
2a. The list of applicants is empty.
Use case ends.
-
3a. The input format is invalid.
-
3a1. RecruitIn shows an error message.
Use case resumes at step 2.
-
Use case: UC11 - Unmarking an applicant
MSS
- User requests to list applicants (UC01).
- RecruitIn displays a list of applicants.
- User requests to unmark applicant(s) in the displayed list.
-
RecruitIn unmarks the requested applicant(s) to “Not Done”.
Use case ends.
Extensions
-
1a. User requests to find applicant (UC06).
Use case resumes at step 2.
-
2a. The list of applicants is empty.
Use case ends.
-
3a. The input format is invalid.
-
3a1. RecruitIn shows an error message.
Use case resumes at step 2.
-
Use case: UC12 - Deleting marked applicants
MSS
- User requests to list applicants (UC01).
- RecruitIn displays a list of applicants.
- User requests to delete all applicants marked as “Done”.
-
RecruitIn deletes all applicants marked as “Done”.
Use case ends.
Extensions
-
1a. User requests to find applicant (UC06).
Use case resumes at step 2.
-
2a. The list of applicants is empty.
Use case ends.
- 3a. The input format is invalid.
-
3a1. RecruitIn shows an error message.
Use case resumes at step 2.
-
- 3b. There are no applicants marked as “Done”.
- 3b1. RecruitIn informs the user that no applicants were marked as “Done”, and thus no applicants were deleted.
Use case ends.
Use case: UC13 - Clear all applicants
MSS
- User requests to list applicants (UC01).
- RecruitIn displays a list of applicants.
- User requests to delete all applicants at once.
-
RecruitIn deletes all applicants saved in RecruitIn.
Use case ends.
Extensions
-
1a. User requests to find applicant (UC06).
Use case resumes at step 2.
-
2a. The list of applicants is empty.
Use case ends.
Use case: UC14 - Exiting RecruitIn
MSS
- User requests to exit RecruitIn.
-
RecruitIn closes.
Use case ends.
Non-Functional Requirements
- Should work on any mainstream OS as long as it has Java
11or above installed. - Should be able to hold up to 1000 persons without a noticeable sluggishness in performance for typical usage.
- A user with above average typing speed for regular English text (i.e. not code, not system admin commands) should be able to accomplish most of the tasks faster using commands than using the mouse.
Glossary
- Applicant: Represents a person that is searching for a job
- Applied Role: Represents the job a person is applying for
- Command: Refers to a text input (which can be combined with user inputs) that executes certain features in RecruitIn
- Employment Type: Represents the type of work contract, specifically Full time, Part time, Temporary & Internship
- Expected Salary: Represents the minimum amount the applicant is willing to be paid for the job
- Level of Education: Represents the highest/current level of education the applicant has, specifically Elementary, Middle School, High School, University, Bachelors, Masters, PhD
- Mainstream OS: Windows, Linux, Unix, OS-X
- Search term: Terms that can be searched for. e.g. Search terms for roles are all the roles that exist in the list, meaning these are all the roles that can be searched for.
- Years of Experience: Represents the number of years the applicant has previously worked in their applied role for
Appendix B: Instructions for manual testing
Given below are instructions to test the app manually.
Launch and shutdown
-
Initial launch
-
Download the jar file and copy into an empty folder
-
Double-click the jar file Expected: Shows the GUI with a set of sample contacts. The window size may not be optimum.
-
-
Saving window preferences
-
Resize the window to an optimum size. Move the window to a different location. Close the window.
-
Re-launch the app by double-clicking the jar file.
Expected: The most recent window size and location is retained.
-
Listing all applicants
- Test case:
list
Expected: All applicants listed without omission. Command success message shown in the result display.
Adding an applicant
-
Adding an applicant while all applicants are being shown
-
Prerequisites: List all applicants using the
listcommand. Multiple applicants in the list. -
Test case:
add n/John Doe p/98765432 e/JohnDoe@gmail.com r/Teacher et/Full time s/3000 l/Bachelors y/4
Expected: A new applicant named John Doe with all of the above details is added to the list. Details of the added contact shown in result display. -
Test case: Ensure that you have completed the first test case under this section, then input the command
add Bob p/98765432 e/bob@gmail.com r/Lawyer et/Full time s/7000 l/Bachelors y/4
Expected: No new applicant is added. Error details shown in the result display stating that Bob shares the same phone number as John Doe. -
Test case: Ensure that you have completed the first test case under this section, then input the command
add Jack Smith p/97865321 e/JohnDoe@gmail.com r/Doctor et/Full time s/9000 l/Bachelors y/4
Expected: No new applicant is added. Error details shown in the result display stating that Jack Smith shares the same email as John Doe. -
Other incorrect add commands to try:
add,add John,add n/John p/98765432 e/JohnDoe@gmail.com r/Teacher(where incomplete details are given for the applicant being added). Expected: Error messages displaying the cause of error is shown in the result display.
-
Editing an applicant
-
Editing an applicant while all applicants are being shown
-
Prerequisites: List all applicants using the
listcommand. Multiple applicants in the list. There is no applicant with the phone number 87654321 and email alexander@gmail.com -
Test case:
edit 1 n/Alexander p/87654321 e/alexander@gmail.com
Expected: First applicant is edited such that his new name is Alexander with the phone number 87654321 and email alexander@gmail.com. Details of the edited applicant shown in the result display. -
Test case: Ensure that you have completed the first test case under this section, then input the command
edit 2 n/Alice p/87654321
Expected: No applicants are edited. Error details shown in the result display stating that the new edited applicant Alice shares either the same phone number or same email as Alexander. -
Test case: Ensure that you have completed the first test case under this section, then input the command
edit 2 n/Alice e/alexander@gmail.com
Expected: No applicants are edited. Error details shown in the result display stating that the new edited applicant Alice shares either the same phone number or same email as Alexander. -
Test case:
edit 2 n/&a#lly
Expected: No applicants are edited. Error details shown in the result display stating that names should only contain alphanumeric characters and spaces. -
Other incorrect edit commands to try:
edit,edit Alexander,edit 1,edit 1 n/(where incomplete or invalid details are given for the applicant being edited)
Expected: Error messages displaying the cause of error is shown in the result display.
-
Deleting an applicant
-
Deleting an applicant while all applicants are being shown
-
Prerequisites: List all applicants using the
listcommand. Multiple applicants in the list. -
Test case:
delete 1
Expected: First applicant is deleted from the list. Details of the deleted applicant shown in the result display. -
Test case:
delete 0
Expected: No applicant is deleted. Error details shown in the result display where indexes should be non-zero unsigned integers. -
Test case:
delete 1 1
Expected: No applicant is deleted. Error details shown in the result display where there should not be any duplicate indexes. -
Test case:
delete 1 2
Expected: First and second applicants are deleted. Details of the deleted contact shown in the result display. -
Other incorrect delete commands to try:
delete,delete x(where x is larger than the list size),delete y(where y is a negative integer),delete Alexander
Expected: Similar to previous test cases.
-
-
Deleting a person from a filtered list of applicants being shown
-
Prerequisites: Find a valid group of applicants using the
findcommand with appropriate inputs. Multiple applicants in the filtered list. -
Test case:
delete 1 2
Expected: First and second applicants of the shown filtered list are deleted. Details of the deleted applicant shown in the result display.
-
Finding an applicant
-
Finding an applicant by a specific prefix with non-empty parameters
-
Prerequisites: For sample data to be utilized, delete the database storage
addressbook.jsonfrom folder/dataand re-run the application. -
Test case:
find n/Alex
Expected: Applicants with ‘Alex’ in the name are listed. Command success message shown in result display. -
Test case:
find i/oct
Expected: Applicants with interviews in October are listed. Command success message shown in result display. -
Test case:
find s/4000
Expected: Applicants with expected salary ranging from3500to4500are listed. Command success message shown in result display. -
Test case:
find y/-1(invalid search terms)
Expected: No change to applicant listed. Error details shown on result display.
-
-
Finding an applicant by a specific prefix with empty parameters
- Test case:
find n/
Expected: All applicants stored are listed. Command success message shown in result display.
- Test case:
-
Finding an applicant by multiple prefixes
-
Prerequisite: For sample data to be utilized, delete the database storage
addressbook.jsonfrom folder/dataand re-run the application. -
Test case:
find s/4000 i/oct
Expected: Applicant with expected salary ranging from3500to4500and interview in October are listed. Command success message shown in result display.
-
-
Finding an applicant without prefixes
- Test case:
find
Expected: No change to applicant listed. Invalid command format error and usage message forfindshown in result display.
- Test case:
Showing search terms
-
Showing unique applicant names when multiple applicants exist in the list
-
Prerequisites: Multiple applicants in the list.
-
Test case:
show n/
Expected: Result display shows a list of unique names belonging to your list of all applicants. -
Test case:
show n/John
Expected:Johninput for name prefixn/is ignored. Result display shows a list of unique names belonging to your list of all applicants.
-
-
Showing unique applicant emails when no applicants exist in the list
-
Prerequisites: Clear all applicants using the
clearcommand. No applicants in the list. -
Test case:
show e/
Expected: Result display should showNo search terms exists for emails.
-
-
Showing unique applicant phone numbers with multiple prefix inputs in command given
-
Prerequisites: Multiple applicants in the list.
-
Test case:
show p/ n/ e/ r/
Expected: Result display shows a list of unique phone numbers belonging to your list of all applicants. -
Test case:
show p/ u/ z/
Expected: Invalid prefixesu/andz/ignored. Result display shows a list of unique phone numbers belonging to your list of all applicants.
-
-
Using show command without prefixes or with invalid prefixes
-
Test case:
show
Expected: No search terms are shown on result display. Error details shown in the result display. -
Other incorrect show commands to try:
show u/,show z/ u/,...(where prefix provided is not allowed by show command)
Expected: Similar to previous.
-
Marking an applicant
-
Marking applicants while all applicants are being shown
-
Prerequisites: List all applicants using the
listcommand. Multiple applicants in the list all currentlyNot Done. -
Test case:
mark 1
Expected: First applicant is marked toDone. Details of the marked applicant shown in the result display. -
Test case:
mark 0
Expected: No applicant is marked. Error details shown in the result display stating that the index is invalid. -
Test case:
mark 2, thenmark 2again
Expected: Second applicant is marked toDonewith the firstmark 2. Details of the marked applicant shown in the result display. For the secondmark 2, no new applicant is marked. Error details shown in the result display stating that an applicant that isDonecannot be marked. -
Test case:
mark 3 3
Expected: No applicant is marked. Error details shown in the result display stating that there should not be duplicate indexes. -
Other incorrect mark commands to try:
mark,mark x(where x is larger than the list size),mark y(where y is any non-positive integer)
Expected: No applicant is marked. Error messages displaying the cause of error is shown in the results display. -
Test case:
mark 4 5
Expected: Fourth and fifth applicant are marked toDone. Details of the marked applicants shown in the result display.
-
-
Marking applicants while a filtered list of applicants are being shown
-
Prerequisites: Find a valid group of applicants using the
findcommand with appropriate inputs. Multiple applicants in the filtered list all currentlyNot Done. -
Test case: Utilize the same test cases in Section 1 of Marking an applicant
Expected: Same results as the corresponding expected test case results in Section 1 of Marking an applicant, while still in the filtered list. -
Test case:
mark 6, thenlist
Expected: Formark 6, the sixth applicant is marked toDoneand details of the marked applicant shown in the result display. Afterlist, locate the marked applicant in the list and the applicant should still beDone.
-
Unmarking an applicant
-
Unmarking applicants while all applicants are being shown
-
Prerequisites: List all applicants using the
listcommand. Multiple applicants in the list all currentlyDone. -
Test case:
unmark 1
Expected: First applicant is unmarked toNot Done. Details of the unmarked applicant shown in the result display. -
Test case:
unmark 0
Expected: No applicant is unmarked. Error details shown in the result display stating that the index is invalid. -
Test case:
unmark 2, thenunmark 2again
Expected: Second applicant is unmarked toNot Donewith the firstunmark 2. Details of the unmarked applicant shown in the result display. For the secondunmark 2, no new applicant is unmarked. Error details shown in the result display stating that an applicant that isNot Donecannot be unmarked. -
Test case:
unmark 3 3
Expected: No applicant is unmarked. Error details shown in the result display stating that there should not be duplicate indexes. -
Other incorrect unmark commands to try:
unmark,unmark x(where x is larger than the list size),unmark y(where y is any negative integer)
Expected: No applicant is unmarked. Error messages displaying the cause of error is shown in the results display. -
Test case:
unmark 4 5
Expected: Fourth and fifth applicant are unmarked toNot Done. Details of the unmarked applicant shown in the result display.
-
-
Marking applicants while a filtered list of applicants are being shown
-
Prerequisites: Find a valid group of applicants using the
findcommand with appropriate inputs. Multiple applicants in the filtered list all currentlyDone. -
Test case: Utilize the same test cases in Section 1 of Unmarking an applicant
Expected: Same results as the corresponding expected test case results in Section 1 of Unmarking an applicant, while still in the filtered list. -
Test case:
unmark 6, thenlist
Expected: Forunmark 6, the sixth applicant is unmarked toNot Doneand details of the unmarked applicant shown in the result display. Afterlist, locate the unmarked applicant in the list and the applicant should still beNot Done.
-
Deleting marked applicants
-
Deleting marked applicants while all applicants are being shown
-
Prerequisites: List all applicants using the
listcommand. Multiple applicants in the list. Some applicants are currentlyDone. -
Test case:
delete_marked
Expected: All the applicants withDoneare deleted from the list. Details of the deleted applicants shown in the result display.
-
-
Deleting marked applicants while a filtered list of applicants are being shown
-
Prerequisites: Find a valid group of applicants using the
findcommand with appropriate inputs. Multiple applicants in the filtered list. Some applicants are currentlyDone. -
Test case:
delete_marked
Expected: All the applicants withDoneare deleted from the list, not just those found in the filtered list. Details of the deleted applicants shown in the result display.
-
Saving data
-
Dealing with missing/corrupted data files
-
Prerequisites: There is already an existing saved
addressbook.jsonfile located in the data file of your home RecruitIn directory. -
Test case: Ensure RecruitIn is closed. Corrupt the
addressbook.jsonfile by typing random letters into it before running RecruitIn.
Expected: RecruitIn will run normally, but with an empty list of applicants. -
Test case: Ensure RecruitIn is closed. Delete the
addressbook.jsonfile before running RecruitIn.
Expected: RecruitIn will run normally, but with the sample list applicants displayed. -
Other incorrect test cases to try: The above two test cases can be tried without closing RecruitIn beforehand.
Expected: RecruitIn will run normally without any side-effects.
-
Appendix C: Effort
The effort required to evolve AB3 to RecruitIn could be estimated to be approximately the effort required to create AB3.
Our team have contributed roughly 11000 lines of functional code, automated unit and integration testing, and documentation.
Listed below are some features and enhancements, and an explanation of the difficulty or effort required to implement them:
Addition of categories
-
AB3initially had theName,Phone Number,Email,Address, andTagcategories. -
RecruitInremoved theAddresscategory, and introduced theApplied Role,Employment Type,Expected Salary,Level of Education,Years of Experience,Interview, andNotescategories, as well as aDonestatus. - The addition of the categories itself was relatively low effort as we were already reusing most of
AB3’s existing categories. - Furthermore, we did not have to make any additional design decisions and could follow the existing architecture in order to add the new categories.
Integration of categories
- This includes integration of the new categories into the existing
add,editandfindcommand. - The integration of the new categories into the
addcommand was done without much relative difficulty. - The integration of the new categories into the
editcommand did involve a refactoring of the entire edit command parser, and thus required relatively more effort. - The integration of the new categories into the
findcommand was very high effort, because of the following 3 reasons:- Each category was filtered by the
findcommand differently, and thus involved multiple differing implementations of how to filter each category. - The
findcommand was improved to allow for searching of multiple categories at the same time. - The
findcommand was modified to validate parameters for each category.
- Each category was filtered by the
Implementation of new features
- This includes the implementation of the
show,mark,unmark,delete_marked, andfilter_interviewcommands.- The implementation of new features was generally high effort due to having to create each command from scratch.
- Difficulties arose mostly from having to make our own design decisions, while at the same time having to following important software engineering principles and practices.
- Additionally, the
deletecommand was improved to allow for deletion of multiple indexes at the same time.- The modification of the existing
deletecommand was generally low effort and only required additions of a few lines of functional code.
- The modification of the existing